Mistletoe Manual
Mistletoe enforces a strict separation between its data-model layer and its presentation layer. The data-model layer as found in mistletoe-core module is reponsible for running a user-specified test suite and the presentation layer is responsible for presenting the results. At this time, two distinct and independent presentation layer implementations exist, namely mistletoe-servlet and mistletoe-wicket.
Mistletoe-servlet is based only on the javax-servlet API in order to minimize the number of dependencies in your applicaiton. Mistletoe-wicket, as the name indicates, is based on the wicket framework.
Test suites
It assumed that you are already familiar with junit and in particular with defining junit test suites. There is plenty of documentation on the subject. For the sake of completeness, here is a very short introduction on the subject.
Given classes ATest
package foo;
import static org.junit.Assert.assertEquals;
import static org.junit.Assert.assertTrue;
import org.junit.Test;

public class ATest {
  @Test
  public void a0() {
    assertEquals(4, 2 + 2);
  }
  @Test
  public void a1() {
    assertTrue("2 and 2 makes 4", 2 + 2 == 4);
  }
}
and BTest
package foo;
import static org.junit.Assert.assertNotNull;
import org.junit.Test;

public class BTest {
  @Test
  public void b0() {
    assertNotNull("hello");
  }
}
You can combine them in a larger test suite as follows
package foo;
import org.junit.runner.RunWith;
import org.junit.runners.Suite;
import org.junit.runners.Suite.SuiteClasses;

@RunWith(Suite.class)
@SuiteClasses( {ATest.class, BTest.class } )
public class CombinedTest {
}
Formally speaking, the ATest class is a test suite
in itself, because since it contains the test cases
a0 and a1. The CombinedTest class shows
how you can combine two test suites to create a larger one. If
desired, CombinedTest could be inserted into an even
larger test suite.
package foo;
import org.junit.runner.RunWith;
import org.junit.runners.Suite;
import org.junit.runners.Suite.SuiteClasses;

@RunWith(Suite.class)
@SuiteClasses({CombinedTest.class, CTest.class})
public class LargerSuite {
}
After you have created an appropriate test suite for
integration testing purposes, mistletoe can run it for you and
present the result in a web-page. The results can be presented by
either mistletoe-servlet or via
mistletoe-wicket modules.
mistletoe-servlet
The mistletoe-servlet module is a offers a single servlet,
namely MistletoeServlet, which can be used to run
test suites.
Installation
Installing MistletoeServlet consists of adding the
following artifacts onto the class path of your
web-application.
- junit-4.10.jar
- mistletoe-core-0.3.jar
- mistletoe-servlet0.3.jar
In addition, you need to add the following lines in the web.xml file of your web-applicaiton.
<servlet>
  <servlet-name>MistletoeServlet</servlet-name>
  <servlet-class>ch.qos.mistletoe.servlet.MistletoeServlet</servlet-class>
  <!-- (OPTIONAL) name the default test suite -->
  <init-param>
    <param-name>defaultTestSuite</param-name>
    <param-value>name.of.test.suite.you.wish.to.run</param-value>
  </init-param>
</servlet>
<servlet-mapping>
  <servlet-name>MistletoeServlet</servlet-name>
  <!-- replace servlet with any other value of your choice -->
  <url-pattern>/servlet/*</url-pattern>
</servlet-mapping>
Images
MisetletoeServlet requires several images which
need to be added to your web-application, under the
images/ folder. These images ship with the mistletoe
distribution under the
mistletoe-test/src/main/webapp/images/ folder. Forgetting to
add these images wil lead to visually unsatisfactory results.
Running MistletoeServlet
After you have added MistletoeServlet in your
application, point your browser to the location where
MistletoeServlet is located. You should see a page
aking to the following.
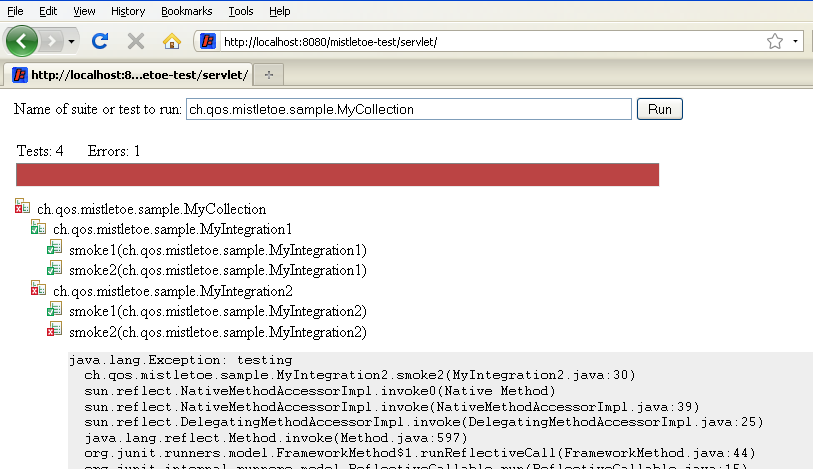
You can instruct this servlet to run any test suite included in
your applicaiton and report the results. That's all there is to
it. Keep in mind thatMistletoeServlet can only be as
useful as the information provided by your test suite.
mistletoe-wicket
The mistletoe-wicket module provides a component called
TestReportPage which can be used to run any test
suite and report the results.
Integration with an already wicket-based application
If your application is already wicket-based, then all you need
is to add mistletoe-core-0.3 and
mistletoe-wicket-0.3 onto the class path
and then add link to the TestReportPage in your
wicket-based application. Clicking on the link you have defined
will allow you to run any junit 4 test suite and see the results
as a web-page.
If you would like TestReportPage to propose a
default test suite to execute, then add the following lines to the
element defining the wicket filter in your application's
web.xml file. Here is an example.
<filter>
  <filter-name>...</filter-name>
  <filter-class>org.apache.wicket.protocol.http.WicketFilter</filter-class>
  ...
  <init-param>
   <param-name>defaultTestSuite</param-name>
   <param-value>fully.qualified.named.of.the.default.Junit4TestSuite</param-value>
  </init-param>
</filter>
Integration with a non wicket-based application
If you are not using Wicket but would like to benefit from the capabilities offered by mistletoe-wicket, then here are the steps you need to follow.
Add the following artifacts on to the class path of your application.
- junit-4.10.jar
- slf4j-api-${slf4j.version}.jar
- mistletoe-core-0.3.jar
- mistletoe-wicket-0.3.jar
- wicket-6.5.0.jar
Add the following class to you application.
package foo;

import org.apache.wicket.protocol.http.WebApplication;
import ch.qos.mistletoe.wicket.TestReportPage;

public class WebRunnerApplication  extends WebApplication {
  @Override
  public Class<TestReportPage> getHomePage() {
    return TestReportPage.class;
  }
}
Add the following XML snipper to the web.xml file of your application.
<filter>
  <filter-name>wicket-mistletoe</filter-name>
  <filter-class>org.apache.wicket.protocol.http.WicketFilter</filter-class>
  <init-param>
    <param-name>applicationClassName</param-name>
    <param-value>foo.WebRunnerApplication</param-value>
  </init-param>
  <init-param>
   <param-name>filterMappingUrlPattern</param-name>
   <param-value>/mistletoe/*</param-value>
  </init-param>
  <!-- (OPTIONAL) the name of the default test suite -->
  <init-param>
   <param-name>defaultTestSuite</param-name>
   <param-value>fully.qualified.named.of.the.default.Junit4TestSuite</param-value>
  </init-param>
</filter>

<filter-mapping>
  <filter-name>wicket-mistletoe</filter-name>
  <url-pattern>/mistletoe/*</url-pattern>
</filter-mapping>
Running TestReportPage
After you have configured your application as described above,
point your browser to the appropriate location. For wicket-based
application the location will be that of the link you defined for
TestReportPage. For a non-wicket-based applicaiton,
the url would be http://hostname/appname/mistletoe/ where
http://hostname/appname/ stands for the url prefix of your applicaiton.
You should see a page akin to the following.
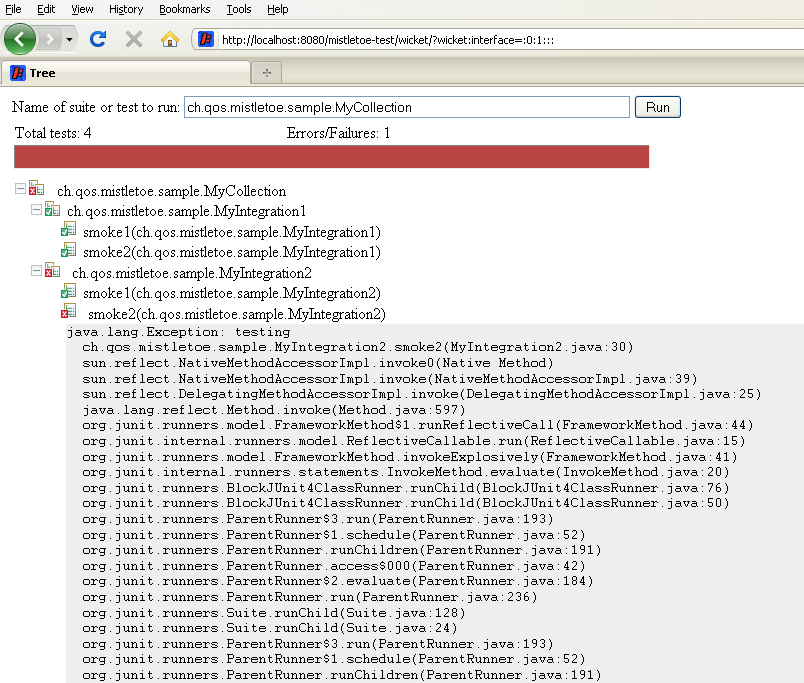
The resulting page is similar to the one produced by
MistletoeServlet but the wicket version is interactive
as you can collapse or expand entire suite trees.